on
tornado教程
最近要做一个新的系统:一个披着邮件系统外衣的消息系统。性能肯定是一方面,所以Webpy就不打算用了。Django本来是我的第一选择,但是觉得Django可能也会出现性能问题。我还是考虑其它的吧。选来选去,最后选择了Torando。
Tornado 是一个用 Python 编写的 Web 框架和异步网络库。它最初由 FriendFeed 开发,后来 Facebook 收购了 FriendFeed 并开源了 Tornado,它有如下特点:
- 简单
- 传说性能好
- 成熟案例 知乎, FriendFeed
简单尝试
- 安装
sudo pip install tornado -
第一个demo
#coding: utf-8 import tornado.ioloop import tornado.web class Index(tornado.web.RequestHandler): def get(self): self.write('Hello, world ! \n') urls = ( ('/', Index), ) def start(): app = tornado.web.Application(urls) app.listen(4322) tornado.ioloop.IOLoop.instance().start() if __name__ == '__main__': start() -
启动:python webpy_test.py 0.0.0.0:4322
- GET 测试:curl http://localhost:4322
结果如下: Hello, world
看到了么,和Webpy长得几乎一模一样。我先简单压测一下它。如果好的话,我觉得可以考虑新系统用它来写,旧系统或者也可以往这方面上转。
-
压测:ab -c 10 -n 1000 http://192.168.95.222:4322/
每秒将近是1443,接近webpy的10倍。This is ApacheBench, Version 2.3 <$Revision: 655654 $> Copyright 1996 Adam Twiss, Zeus Technology Ltd, http://www.zeustech.net/ Licensed to The Apache Software Foundation, http://www.apache.org/ Benchmarking 192.168.95.222 (be patient) Completed 100 requests Completed 200 requests Completed 300 requests Completed 400 requests Completed 500 requests Completed 600 requests Completed 700 requests Completed 800 requests Completed 900 requests Completed 1000 requests Finished 1000 requests Server Software: TornadoServer/2.1.1 Server Hostname: 192.168.95.222 Server Port: 4322 Document Path: / Document Length: 16 bytes Concurrency Level: 10 Time taken for tests: 0.693 seconds Complete requests: 1000 Failed requests: 0 Write errors: 0 Total transferred: 174000 bytes HTML transferred: 16000 bytes Requests per second: 1443.30 [#/sec] (mean) Time per request: 6.929 [ms] (mean) Time per request: 0.693 [ms] (mean, across all concurrent requests) Transfer rate: 245.25 [Kbytes/sec] received Connection Times (ms) min mean[+/-sd] median max Connect: 1 1 1.0 1 13 Processing: 1 6 1.9 5 18 Waiting: 1 5 1.8 5 18 Total: 3 7 1.8 6 19 Percentage of the requests served within a certain time (ms) 50% 6 66% 7 75% 7 80% 7 90% 8 95% 10 98% 13 99% 17 100% 19 (longest request) -
压测-100并发,2000请求:ab -c 100 -n 2000 http://192.168.95.222:4322/
每秒1800个请求,响应为53.8ms,很强大啊。This is ApacheBench, Version 2.3 <$Revision: 655654 $> Copyright 1996 Adam Twiss, Zeus Technology Ltd, http://www.zeustech.net/ Licensed to The Apache Software Foundation, http://www.apache.org/ Benchmarking 192.168.95.222 (be patient) Completed 200 requests Completed 400 requests Completed 600 requests Completed 800 requests Completed 1000 requests Completed 1200 requests Completed 1400 requests Completed 1600 requests Completed 1800 requests Completed 2000 requests Finished 2000 requests Server Software: TornadoServer/2.1.1 Server Hostname: 192.168.95.222 Server Port: 4322 Document Path: / Document Length: 16 bytes Concurrency Level: 100 Time taken for tests: 1.075 seconds Complete requests: 2000 Failed requests: 0 Write errors: 0 Total transferred: 348000 bytes HTML transferred: 32000 bytes Requests per second: 1860.06 [#/sec] (mean) Time per request: 53.762 [ms] (mean) Time per request: 0.538 [ms] (mean, across all concurrent requests) Transfer rate: 316.06 [Kbytes/sec] received Connection Times (ms) min mean[+/-sd] median max Connect: 1 1 1.0 1 8 Processing: 4 51 13.0 46 76 Waiting: 4 51 13.0 46 75 Total: 8 53 12.8 48 77 Percentage of the requests served within a certain time (ms) 50% 48 66% 65 75% 65 80% 65 90% 66 95% 70 98% 73 99% 73 100% 77 (longest request)
那就选它了。
主要核心
Handler
对于Tornado而言,MVC中的C就是它的Handler。Torando的Handler非常好写,只要继承自tornado.web.RequestHandler就好了。下面我统一的把Handler叫做Controller,因为习惯了这种叫法。对于Controller的主要调用顺序如下:
__init__:构造方法,如果需要在开始做一些事情的话,不推荐在这里。而推荐使用initialize-
initialize:这里做事情,比方说给这个Controller加入一些成员变量。例如:class TestController(tornado.web.RequestHandler): def initialize(self): self.uuid = uuid.uuid4().hex -
prepare:调用具体的get/post/...方法之前,会调用它。在这里加入加入一些权限控制。比如说,除了登陆页面外,需要登陆成功了才能进行访问。class TestController(tornado.web.RequestHandler): def prepare(self): if not self.request.uri.startswith(self.get_login_url()) \ and self.current_user is None: self.redirect(self.get_login_url()) -
get/post/put/delete/...:具体业务的方法 -
get_error_html:当有异常抛出的时候会调用它, 比方说,我们要渲染自己的错误页面def get_error_html(self, status_code, **kwargs): return self.render_string( 'my_error.html', code=code, message=message, exception=exception ) -
finish:这个是一个很重要的方法,因为tornado最后总会调用finish一次,且仅仅调用一次。这个是由于它是异步框架的原因。
除了上面的调用顺序中的几个方法,常用的就是下面的了:
-
get_current_user:得到当前用户,这个需要自己重写。一般的做法,从cookie中找到相应的session信息,再通过查session或者查db找到具体的用户def get_current_user(self): username = self.get_secure_cookie("user") return self.db.get("select * from user where username = %s", username) if username else None -
redirect:302跳转到某个地址。我一般喜欢封装一下,封装为:def redirect_to(self, path, notice = None): self.notice(notice) return self.redirect(path)
这里的notice其实类似于rails中的flash。利用cookie实现的。代码如下:
def notice(self, value = None):
    if value is not None:
        _value = urllib2.quote(value.encode('utf-8'), 'true')
        self.set_cookie(self.FLASH_COOKIE_KEY, _value)
    else:
        v = self.get_cookie(self.FLASH_COOKIE_KEY, None)
        self.clear_cookie(self.FLASH_COOKIE_KEY)
return urllib.unquote_plus(v).decode('utf-8') if v is not None else vrender:渲染某个页面,同样我也细化封装一下:
这样我就可以传入更多的默认渲染的东西def render_view(self, view_name, notice = None, **kwargs): kwargs.update(filters) _notice = notice or self.notice() return self.render(view_name, notice = _notice, **kwargs)
DB操作
tornado 的db操作非常简单。简单到没有。仅仅只是对 mysql提供了基本的封装。
-
打开连接:
db = database.Connection(host, database, user=None, password=None, max_idle_time=7 * 3600) -
查询多条记录
# 可能sql注入 for user in db.query("SELECT * FROM user WHERE gender='f'"): print user.username, user.password # 没有sql注入 db.query("SELECT * FROM user WHERE gender = %s", 'f'): -
查询单条记录:永远只是返回第1条
db.get('SELECT * FROM user WHERE id = 1') # 可能有sql注入 db.get('SELECT * FROM user WHERE id = %s', 1) # 没有sql注入 -
删除/修改/插入
db.execute(sql, *parameters) -
批量 的删除/修改/插入
注意: 没有transaction的处理。db.executemany(sql, *parameters)
Templates
tornado的templates,就是MVC的V,即:view。对于页面上常用的tag,基本和django一样。最大的差距就是所有的都是end结尾。不像django的endif等等。
常用tag
-
if比django的好,django没有elif{% if %} {% elif %} {% else %} {% end %} -
block和 django不同点:不需要 endblock{% block %} {% end %} -
extend和django的一样{% extend %} -
for循环和django一样{% for %} {% end %} -
设置变量:
一个变量 name = 'poy', 这个对于一些navgation的高亮很有帮助。
{% set name='poy' %}- 嵌入python代码:django里面只能是filter,但是Tornado是允许在template里面直接写python的代码的:
对于python代码,可以直接封装成方法,然后,tornado可以直接在handler render 一个template的的时候把相应的function以key-value的方式传过来,这样就可以直接使用了。{{ 'RyanPoy'.lower() }}
class HelloHandler(WebHandler):
return self.render('test.html', hello = lambda name: 'hello, %s' % name)test.html里面写:
{{ hello('pengyi') }}Route
tornado的url就是下面的形式:
urls = [
    (r'/user/show/', UserShow),
    (r'/user/login/', UserLogin),
    (r'/group/maillist/', GroupMaillist),
]
接下来,就是url的自动生成了。我写了一个route.py的文件。 route.py
#coding: utf-8
import os
import sys

def __url_of(module_name):
    return '/'.join([ v for v in module_name.split('_') if v ])

def reasoning():
    from app.controllers.base_controller import BaseController
    valible_suffix = ['/']
    controllers_dir = 'app/controllers'
    controllers_package = '.'.join(controllers_dir.split('/'))
    controllers_dir = os.path.normpath(os.path.join(os.path.dirname(__file__), '..', controllers_dir))
    urls = []
    for _, _, files in os.walk(controllers_dir):
        for f in files:
            if f == 'base_controller.py' or not f.endswith('controller.py'):
                continue

            prefix_name = f[0:-3] # 3 为 len('.py')
            model_name = prefix_name[0:-11]  # 11 为 len('_controller')
            module_name = controllers_package + '.' + prefix_name
            module = __import__(module_name, fromlist=['*']) # 导入所有的内容到内存中

            for class_name in dir(module):
                try:
                    obj = getattr(module, class_name)
                    if obj is BaseController or not issubclass(obj, BaseController):
                        continue
                except TypeError, _:
                    continue

                clazz = getattr(module, class_name)
                controller_file_name = module_name.split('.')[-1]
                for suffix in valible_suffix:
                    if controller_file_name != 'index_controller':
                        url = '/%s/%s%s' % (__url_of(model_name), class_name.lower(), suffix)
                    else: # 如果是index_controller,那么映射只有class name,controller name 不要
                        url = '/%s%s' % (class_name.lower(), suffix)
                    urls.append((url, clazz))

                if class_name.lower() == 'index':
                    for suffix in valible_suffix:
                        if controller_file_name != 'index_controller':
                            url = '/%s%s' % (__url_of(model_name), suffix)
                            urls.append((url, clazz))
    return urls


def special():
    import app.controllers as controllers
    mapping = {
        '/': controllers.user_controller.Login
    }
    urls = []
    for url, clazz in mapping.iteritems():
        urls.append((url, clazz))
    return urls


def all():
    def merge(all_urls_dict, mappings):
        for mapping in mappings:
            url, clazz = mapping[0], mapping[1]
            all_urls_dict[url] = (url, clazz)

    def merge_of(reasoning, special):
        all = {}
        merge(all, reasoning)
        merge(all, special)
        urls = all.values()
        urls.sort()
        return urls

    return merge_of(reasoning(), special())


def show(url_mappings):
    for mapping in url_mappings:
        print mapping


if __name__ == '__main__':
    name = 'all'
    if len(sys.argv) == 2 and sys.argv[1] in ('all', 'reasoning', 'special'):
        name = sys.argv[1]
    urls = eval(name)()
    show(urls)
对于controller的写法如下:
company_controller.py
#coding: utf-8

from app.controllers.base_controller import BaseController

class Index(BaseController):

    def get(self):
        pass

    def post(self):
        pass


class List(BaseController):

    def get(self):
        pass

    def post(self):
        pass


class Create(BaseController):

    def get(self):
        pass

    def post(self):
        pass

class Show(BaseController):

    def get(self):
        pass

    def post(self):
        pass


class Update(BaseController):

    def get(self):
        pass

    def post(self):
        pass
合体Django
之前有提过,tornado的db非常的简单,只有一个基于mysql的基础封装,而这个封装甚至连事务都没有。所以,如果我们采用tornado的db能做的事情就是写sql语句。
对于小型的系统还好,对于一些中/中大/大型业务系统,sql写起来是比较费事费时的,成本很高,尤其是以后的维护成本。
所以,我们需要引入一个第3方的ORM。在Python,ORM最著名的莫过于 sqlalchemy 和 sqlobject了。
那我们在tornado中就用它们?答案是否定的。原因是:我们期望能够有一个类似DJango的Admin管理界面。
好吧,程序员总是很懒惰的,哪怕一个字母都不愿意多敲。程序员总是很贪心的,哪怕能多一片叶子,也要仅仅的攥着手中。
现在的实际情况就来了,我们能不能利用DJango提供的ORM和Admin,为Tornado使用呢 ?
经过一天的研究,答案是肯定的。下面,我们就来具体的讲讲。
生成Django项目
django-admin.py startproject Tornadjango创建一个app 我习惯只有一个app,且命名为app
cd Tornadjango
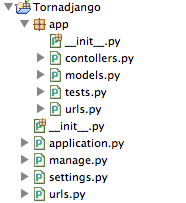
python manage.py startapp app修改app目录下的文件名 这个也是我习惯了的命名规则, 创建controllers.py, 删除views.py,在工程目录下面创建application.py。此时,目录结构应该如下:
修改 url.py
#coding: utf-8

from django.conf.urls.defaults import patterns, include
from django.contrib import admin
import django
import os

admin.autodiscover()

MEDIA_ROOT = os.path.join(os.path.dirname(django.__file__), 'contrib', 'admin', 'media')

urlpatterns = patterns('',
    (r'^admin/media/(?P<path>.*)$', 'django.views.static.serve',{'document_root': MEDIA_ROOT, 'show_indexes': False}),
    (r'^admin/', include(admin.site.urls)),
)
修改settings.py
# Django settings for Tornadjango project.
import os

DEBUG = True
TEMPLATE_DEBUG = DEBUG

PROJECT_PATH = os.path.join(os.path.dirname(__file__))

ADMINS = (
    # ('Your Name', 'your_email@example.com'),
)

MANAGERS = ADMINS

DATABASES = {
    'default': {
        'ENGINE': 'django.db.backends.sqlite3', # Add 'postgresql_psycopg2', 'postgresql', 'mysql', 'sqlite3' or 'oracle'.
        'NAME': 'tornadjango',                      # Or path to database file if using sqlite3.
        'USER': '',                      # Not used with sqlite3.
        'PASSWORD': '',                  # Not used with sqlite3.
        'HOST': '',                      # Set to empty string for localhost. Not used with sqlite3.
        'PORT': '',                      # Set to empty string for default. Not used with sqlite3.
    }
}

# Local time zone for this installation. Choices can be found here:
# http://en.wikipedia.org/wiki/List_of_tz_zones_by_name
# although not all choices may be available on all operating systems.
# On Unix systems, a value of None will cause Django to use the same
# timezone as the operating system.
# If running in a Windows environment this must be set to the same as your
# system time zone.
TIME_ZONE = 'Asia/Shanghai'

# Language code for this installation. All choices can be found here:
# http://www.i18nguy.com/unicode/language-identifiers.html
LANGUAGE_CODE = 'zh-cn'

SITE_ID = 1

# If you set this to False, Django will make some optimizations so as not
# to load the internationalization machinery.
USE_I18N = True

# If you set this to False, Django will not format dates, numbers and
# calendars according to the current locale
USE_L10N = True

# Absolute filesystem path to the directory that will hold user-uploaded files.
# Example: "/home/media/media.lawrence.com/media/"
MEDIA_ROOT = ''

# URL that handles the media served from MEDIA_ROOT. Make sure to use a
# trailing slash.
# Examples: "http://media.lawrence.com/media/", "http://example.com/media/"
MEDIA_URL = ''

# Absolute path to the directory static files should be collected to.
# Don't put anything in this directory yourself; store your static files
# in apps' "static/" subdirectories and in STATICFILES_DIRS.
# Example: "/home/media/media.lawrence.com/static/"
STATIC_ROOT = ''

# URL prefix for static files.
# Example: "http://media.lawrence.com/static/"
STATIC_URL = '/static/'

# URL prefix for admin static files -- CSS, JavaScript and images.
# Make sure to use a trailing slash.
# Examples: "http://foo.com/static/admin/", "/static/admin/".
ADMIN_MEDIA_PREFIX = '/admin/media/'

# Additional locations of static files
STATICFILES_DIRS = (
    # Put strings here, like "/home/html/static" or "C:/www/django/static".
    # Always use forward slashes, even on Windows.
    # Don't forget to use absolute paths, not relative paths.
)

# List of finder classes that know how to find static files in
# various locations.
STATICFILES_FINDERS = (
    'django.contrib.staticfiles.finders.FileSystemFinder',
    'django.contrib.staticfiles.finders.AppDirectoriesFinder',
#    'django.contrib.staticfiles.finders.DefaultStorageFinder',
)

# Make this unique, and don't share it with anybody.
SECRET_KEY = 'oa8xplu6_lhlegtxpc(f+!tc=2$%&oumz4zx2_1d*vio75z3c7'

# List of callables that know how to import templates from various sources.
TEMPLATE_LOADERS = (
    'django.template.loaders.filesystem.Loader',
    'django.template.loaders.app_directories.Loader',
#     'django.template.loaders.eggs.Loader',
)

MIDDLEWARE_CLASSES = (
    'django.middleware.common.CommonMiddleware',
    'django.contrib.sessions.middleware.SessionMiddleware',
    'django.middleware.csrf.CsrfViewMiddleware',
    'django.contrib.auth.middleware.AuthenticationMiddleware',
    'django.contrib.messages.middleware.MessageMiddleware',
)

ROOT_URLCONF = 'urls'

TEMPLATE_DIRS = (
    # Put strings here, like "/home/html/django_templates" or "C:/www/django/templates".
    # Always use forward slashes, even on Windows.
    # Don't forget to use absolute paths, not relative paths.
)

INSTALLED_APPS = (
    'django.contrib.auth',
    'django.contrib.contenttypes',
    'django.contrib.sessions',
    'django.contrib.sites',
    'django.contrib.messages',
    'django.contrib.staticfiles',
    # Uncomment the next line to enable the admin:
        'django.contrib.admin',
    # Uncomment the next line to enable admin documentation:
        'django.contrib.admindocs',
    # customer app
    'app',
)

# A sample logging configuration. The only tangible logging
# performed by this configuration is to send an email to
# the site admins on every HTTP 500 error.
# See http://docs.djangoproject.com/en/dev/topics/logging for
# more details on how to customize your logging configuration.
LOGGING = {
    'version': 1,
    'disable_existing_loggers': False,
    'handlers': {
        'mail_admins': {
            'level': 'ERROR',
            'class': 'django.utils.log.AdminEmailHandler'
        }
    },
    'loggers': {
        'django.request': {
            'handlers': ['mail_admins'],
            'level': 'ERROR',
            'propagate': True,
        },
    }
}
修改app.controller.py
#coding: utf8

import tornado.web


class HelloController(tornado.web.RequestHandler):

    def get(self):
        self.write('Hello, world ! \n')
修改application.py
#coding: utf-8
import os
os.environ['DJANGO_SETTINGS_MODULE'] = 'settings'

import settings
import app.urls
from django.core.handlers.wsgi import WSGIHandler
from tornado import options, wsgi
import tornado.httpserver


options.define('admin_port', default=9900, type=int, help='Run admin platform on the given port')
options.define('app_port', default=9901, type=int, help='Run app platform on the given port')


tornado_env = dict(
#    template_path       = os.path.join(os.path.dirname(__file__), 'templates'),
#    static_path         = os.path.join(os.path.dirname(__file__), 'static'),
    xsrf_cookies        = False,
    cookie_secret       = "11oETzKXQAGaYdkL5gEmGeJJFuYh7EQnp2XdTP1o/Vo=",
    autoescape          = None,
    debug               = settings.DEBUG,
    login_url           = '/',
)


if __name__ == "__main__":
    options.parse_command_line()
    address, admin_port, app_port = '0.0.0.0', options.options.admin_port, options.options.app_port

    def admin_listen():
        wsgi_app = wsgi.WSGIContainer(WSGIHandler())
        tornado_app = tornado.web.Application([
            ('/admin/(.*)', tornado.web.FallbackHandler, dict(fallback=wsgi_app)),
        ])
        tornado.httpserver.HTTPServer(tornado_app).listen(admin_port)
        print 'run admin platform on (%s:%s)' % (address, admin_port)

    def app_listen():
        tornado_app = tornado.web.Application(app.urls.urls)
        tornado_app.listen(app_port)
        print 'run app platform on (%s:%s)' % (address, app_port)

    app_listen()
    admin_listen()

    tornado.ioloop.IOLoop.instance().start()
创建db
python manager.py syncdb启动
python application.py浏览器访问
http://localhost:9901/            # tornado app
http://localhost:9900/admin/      # django admin
这样整个步骤就完成了。
加载Django环境
django很优秀的,只需要有一个settings.py就把django需要的环境都包含了。所以,在application.py的上面要写上:
    import os
    os.environ['DJANGO_SETTINGS_MODULE'] = 'settings'
启动django服务
django是http基于wsgi的,所以如果你要用django的admin,就必须启动wsgi。所以,在application.py里面有这样的代码:
def admin_listen():
    wsgi_app = wsgi.WSGIContainer(WSGIHandler())
    tornado_app = tornado.web.Application([
        ('/admin/(.*)', tornado.web.FallbackHandler, dict(fallback=wsgi_app)),
    ])
    tornado.httpserver.HTTPServer(tornado_app).listen(admin_port)
    print 'run admin platform on (%s:%s)' % (address, admin_port)
要修改工程的urls.py
对于纯粹的django环境,django的admin对应的url可以自动的找到。但是由于我们是通过tornado的IOLoop代理过去的,就需要自己手动配置。所以,在urls.py里面有这样的代码:
admin.autodiscover()

MEDIA_ROOT = os.path.join(os.path.dirname(django.__file__), 'contrib', 'admin', 'media')

urlpatterns = patterns('',
    (r'^admin/media/(?P<path>.*)$', 'django.views.static.serve',{'document_root': MEDIA_ROOT, 'show_indexes': False}),
    (r'^admin/', include(admin.site.urls)),
)
要修改settings.py里面的ADMIN_MEDIA_PREFIX
ADMIN_MEDIA_PREFIX 需要配置成为urls.py里面的urlpatterns对应的地址,否则会找不到静态资源
使用Django的orm
怎么使用django的orm。下面来说一说。
orm本身
直接使用django的orm,不管是django的admin还是tornado都是一样的。
事务
对于commit_on_success的方式
一定要注意一下:要自动提交,需要django的middleware。但是django的middelware又只有在django的http环境中才生效,那么对于tornado的http环境,如何生效呢?
大家都知道django的middelware是在进入request之后,和response之前。所以,我们完全可以考虑直接把middelware的方法拿来用。下面是django的traction middelware的源代码。
django.middleware.transaction.py
class TransactionMiddleware(object):
    """
    Transaction middleware. If this is enabled, each view function will be run
    with commit_on_response activated - that way a save() doesn't do a direct
    commit, the commit is done when a successful response is created. If an
    exception happens, the database is rolled back.
    """
    def process_request(self, request):
        """Enters transaction management"""
        transaction.enter_transaction_management()
        transaction.managed(True)

    def process_exception(self, request, exception):
        """Rolls back the database and leaves transaction management"""
        if transaction.is_dirty():
            transaction.rollback()
        transaction.leave_transaction_management()

    def process_response(self, request, response):
        """Commits and leaves transaction management."""
        if transaction.is_managed():
            if transaction.is_dirty():
                transaction.commit()
            transaction.leave_transaction_management()
return responsebase_controller.py
class BaseController(tornado.web.RequestHandler):

    def initialize(self, application, request, **kwargs):
        self.has_except = False

    def prepare(self):
        """Enters transaction management"""
        transaction.enter_transaction_management()
        transaction.managed(True)

    def get_error_html(self, status_code, **kwargs):
        try:
            self.has_except = True
            if transaction.is_dirty():
                transaction.rollback()
            transaction.leave_transaction_management()
        except:
            pass
        finally:
            super(BaseController, self).get_error_html(status_code, **kwargs)

    def finish(self, chunk=None):
        try:
            return super(BaseController, self).finish(chunk=chunk)
        finally:
            if not self.has_except and transaction.is_managed():
                if transaction.is_dirty():
                    transaction.commit()
                transaction.leave_transaction_management()
            django.db.reset_queries()
django.db.close_connection()异步调用
Tornado是一个异步框架,在单独的实例跑的时候,要注意。对于一些响应很长的操作,需要进行异步处理。
比方说,有一个第3方的api调用,一般都修改为异步处理。这样能保证你的服务正常被响应,而不会出现阻塞。
class Download(BaseController):

    @tornado.web.asynchronous
    def get(self):

        def _(response):
            self.finish(response.body)

        url = self.get_argument('download_url', '', True)
httpclient.AsyncHTTPClient().fetch(url, _)class Download(BaseController):
@tornado.web.asynchronous
@gen.engine
def get(self):
url = self.get_argument('download_url', '', True)
response = yield gen.Task(client.fetch, url)
self.finish(response.body)基础知识
yield和generator
对于python中的yield, 大家应该都知道。
# -*- coding:utf-8 -*-

def foo(n):
    for i in range(n):
        yield i

for x in foo(2):
    print x
上面的代码输出的就是1,2。注意上面的代码,可以看到foo(1)其实返回的就是一个generator。 可以理解为一旦遇到yield的语句,就会返回一个generator。看看官方的解释:
Any function containing a yield keyword is a generator function;
从上面的基本代码来看,我们可以简单的理解为:遇到yield i, 就返回i,并且产生函数的临时中断,控制权交给外面的代码。等外面的代码消耗了这个返回值后,控制权在交回给函数,从之前的临时中断处再接着执行。
当然,上述的理解并不完全正确。我们再来看看下面的代码。
# -*- coding:utf-8 -*-
def foo(n):
    for i in range(n):
        yield i

g = foo(2)      # 1
print g.next()  # 2
print g.next()  # 3
print g.next()  # 4
上面的代码输出的是:
0
1
Traceback (most recent call last):
    File "/Users/ryan/Workspace/myself/Tornadjango/app/tmp.py", line 10, in <module>
    print g.next()
StopIteration
现在明白了么?因为foo方法里面有yield,所以调用它总是会返回一个generator。所以
1 得到一个generator,且在1的时候,foo函数不会有任何的执行。在解释器分析代码的时候,发现foo里面有yield,就已经把它当成一个generator了。
2 得到generator的第一个值 0
3 得到generator的第二个值 1
4 由于generator已经完毕,所以,抛出StopIteration异常
再来看下面的代码:
# -*- coding:utf-8 -*-

def foo(n):
    for i in range(n):
        v = yield i
        print 'v_%s = %s' % (i, v) # 5

g = foo(2)       # 1
print g.next()   # 2
print g.next()   # 3
print g.next()   # 4
这个时候,结果是:
0
v_0 = None
1
v_1 = None
Traceback (most recent call last):
    File "/Users/ryan/Workspace/myself/Tornadjango/app/tmp.py", line 11, in <module>
    print g.next()
StopIteration再看下面的代码:
# -*- coding:utf-8 -*-
def foo(n):
    for i in range(n):
        v = yield i
        print 'v_%s = %s' % (i, v)

g = foo(2)
print g.next()
print g.send('a')0
v_0 = a
1那我们这样写呢?
# -*- coding:utf-8 -*-

def foo(n):
    for i in range(n):
        v = yield i
        print 'v_%s = %s' % (i, v)

g = foo(2)
print g.send('a') Traceback (most recent call last):
File "/Users/ryan/Workspace/myself/Tornadjango/app/tmp.py", line 9, in <module>
print g.send('a')
TypeError: can't send non-None value to a just-started generator-
generator.next() 等价于 generator.send(None)
-
对于一个generator,一定要先调用一个next,或者send(None)。才能再调用send(value)
-
调用send(value)的时候,会把value的值赋给里面的接收者,且是上一次next的中断位置
前面,我们说过tornado的web异步调用。下面我们来分析一下。
先看下面的代码。
# -*- coding:utf-8 -*-
from tornado import ioloop, httpclient

def deal(response):
    print 'response.length =', len(response.body)
    ioloop.IOLoop.instance().stop()


def download(url):
    http_client = httpclient.AsyncHTTPClient()
    http_client.fetch(url, deal)


download("http://www.baidu.com/")
ioloop.IOLoop.instance().start()response.length = 10233很明显的可以看出。http_client的fetch只是一个异步调用。需要传递一个deal方法,作为callback来去处理fetch后的response。
如果我们用tornado的gen.engine方式可以这样写:
from tornado import ioloop, httpclient, gen
from tornado.gen import Task

@gen.engine
def download(url):
    http_client = httpclient.AsyncHTTPClient()
    response = yield Task(http_client.fetch, url)
    print 'response.length =', len(response.body)
    ioloop.IOLoop.instance().stop()

download("http://www.baidu.com/")

ioloop.IOLoop.instance().start()# -*- coding:utf-8 -*-
from tornado import ioloop, httpclient
import functools
class MyTask(object):
def __init__(self, func, *args, **kwargs):
self.func = func
self.args = args
self.kwargs = kwargs
def callback(self, response):
try:
self.gen.send(response)
except StopIteration:
pass
def run(self, gen):
self.gen = gen
partail_func = functools.partial(self.func, *self.args, **self.kwargs)
partail_func(callback = self.callback)
def myengine(func):
def _(*args, **kwargs):
task_generator = func(*args, **kwargs)
task = task_generator.next()
task.run(task_generator)
return _
@myengine
def download(url):
http_client = httpclient.AsyncHTTPClient()
response = yield MyTask(http_client.fetch, url)
print 'response.length =', len(response.body)
ioloop.IOLoop.instance().stop()
download("http://www.baidu.com/")
ioloop.IOLoop.instance().start()
这个时候,结果是:
```python
response.length = 10233